close
iOS 5 的 UIKit 粒子系統
since: 2012/07/03
update: 2012/07/10
reference:
UIKit Particle Systems in iOS 5 Tutorial | Ray Wenderlich
A. 說明
使用粒子系統的例子:
1. UIKit games:
你可以完全只使用 UIKit 來製作遊戲(如紙牌類的遊戲, 運作的相當不錯).
現在, 你可以使用爆炸, 煙霧等效果來使遊戲有更佳的體驗.
2. Slick(圓滑的) UI effects:
當使用者在螢幕上移動一個物體時, 可以留下拖曳的煙霧效果.
3. Stunning(令人震驚的) screen transitions(轉變):
在 App 顯示下一個螢幕時, 讓之前的畫面消失在火球之中.
---------------------------------------------------------------------------------------
B. 粒子 APIs
1. 有二個在 QuartzCore 框架中的類別, 可供使用來建立粒子系統, 分別是:
CAEmitterLayer 與 CAEmitterCell.
備註:
a. CAEmitterLayer Class Reference:
CAEmitterLayer 類別提供一個 Core Animation 的粒子發射(emitter)系統.
粒子藉由
的背景色之上與 layer 的邊緣(border)之上.
CAEmitterCell 類別用來在 CAEmitterLayer 中將一個粒子來源發射出去.
Emitter cell 定義了發射的方向與發射粒子的相關屬性. Emitter cells 可以
有存放 sub-cells 的陣列, 這使得粒子本身可以再發射粒子.
*********************************************************
2. 一般的概念是, 先建立一個 CAEmitterLayer, 將一個或多個 CAEmitterCells
加入其中. 每個 cell 會依照各自的設定來產生粒子效果.
3. 並且, 因為 CAEmitterLayer 是繼承自 CALayer, 你可以在 UIKit 的任何階層
(hierarchy)中輕易地來引入使用.
4. 我覺得這個新的 UIKit 粒子系統最酷的事情是: 單一的 CAEmitterLayer 可以
持有很多個 CAEmitterCells. 這使你可以完成一些很複雜的極酷特效. 例如,
如果要建立一個噴水池, 你可以用一個 cell 發射水滴粒子, 並且用另一個 cell
在噴水池上方發射水蒸氣粒子.
---------------------------------------------------------------------------------------
Single View Application > Next

*********************************************************
2. 加入以下的 Framework:

備註: 目前專案的 Framework 如下:
 ---------------------------------------------------------------------------------------
D. 客製化 UIView 類別 (將 CAEmitterLayer 作為 UIView 的 layer)
1. Xcode > File > New > New File...
iOS > Cocoa Touch > Objective-C class > Next
Class: DWFParticleView
Subclass of: UIView
> Next > Create

*********************************************************
2. 開啟 DWFParticleView.m 檔案, 修改如下:
#import "DWFParticleView.h"
//@add
#import <QuartzCore/QuartzCore.h>
//@add
@interface DWFParticleView ()
{
CAEmitterLayer *fireEmitter;
}
@property (nonatomic, strong) CAEmitterLayer *fireEmitter;
@end
@implementation DWFParticleView
//@add
@synthesize fireEmitter = _fireEmitter;
- (id)initWithFrame:(CGRect)frame
{
self = [super initWithFrame:frame];
if (self) {
// Initialization code
}
return self;
}
/*
// Only override drawRect: if you perform custom drawing.
// An empty implementation adversely affects performance during animation.
- (void)drawRect:(CGRect)rect
{
// Drawing code
}
*/
//@add
-(void)awakeFromNib
{
//set ref to the layer
self.fireEmitter = (CAEmitterLayer *)self.layer;
}
//@add: overwriting
+ (Class)layerClass
{
//configure the UIView to have emitter layer
return [CAEmitterLayer class];
}
@end
*********************************************************
3. 將 view controller 的 root view 設為 DWFParticleView:
開啟 MainStoryboard.storyboard 檔案, 修改如下:
選取左方 View Controller 下的 UIView
> 點選右上方的 "Identity inspector"
> 將 Class 由 UIView 改選為 DWFParticleView.

---------------------------------------------------------------------------------------
為了要發射出火焰, 煙霧, 瀑布等等, 你需要有一個 PNG 檔案來作為粒子的起始.
原作者提供一個 PNG 檔案下載, 請將其加入到專案裡. 這個粒子檔案大小為:
32×32 pixels, 具透明度, 僅使用有點古怪的白色筆刷來隨機繪製. 對粒子而言,
粒子的發射器最佳的顏色就是白色的, 它可以讓我們將想要的顏色畫在所提供的
圖像上. 建立半透明的粒子圖像也是個不錯的想法, 如此一來, 粒子系統就可以
藉由粒子本身來作混合.
*********************************************************
2. 開啟 DWFParticleView.m 檔案, 修改如下:
....
-(void)awakeFromNib
{
// 1. Set ref to the layer
self.fireEmitter = (CAEmitterLayer *)self.layer;
// 2. Configure the emitter layer
//
// set the position of the emitter
self.fireEmitter.emitterPosition = CGPointMake(50, 50);
// set the size of the particles to spawn
self.fireEmitter.emitterSize = CGSizeMake(10, 10);
// 3. Add a CAEmitterCell to the CAEmitterLayer
//
// creating a cell instance
CAEmitterCell *fire = [CAEmitterCell emitterCell];
// birthRate(出生率): 每秒發射出的粒子數目. 對於一個好的火焰或瀑布粒子而言,
// 最少需要幾百個粒子, 所以在此設為 200.
fire.birthRate = 200;
// lifetime(壽命): 粒子消失前的存活秒數, 所以在此設為 3.0.
fire.lifetime = 3.0;
// lifetimeRange(壽命的變化範圍): 系統會在 (lifetime – lifetimeRange,
// lifetime + lifetimeRange) 這個範圍內, 隨機取得粒子的壽命時間.
// 因此, 在此例中, 粒子的壽命時間介於 2.5 ~ 3.5 秒之間.
fire.lifetimeRange = 0.5;
// color(顏色): 粒子內容的著色效果. 在此選擇橘色.
fire.color = [[UIColor colorWithRed:0.8 green:0.4 blue:0.2 alpha:0.1] CGColor];
// contents(內容): 提供給發射的 cell 使用的內容, 通常是一個 CGImage 物件.
// 在此設為粒子圖像.
fire.contents = (id)[[UIImage imageNamed:@"Particles_fire.png"] CGImage];
// name(名稱): 你可以為要發射的 cell 設定一個名稱, 以便在之後方便查找
// 和修改屬性.
[fire setName:@"fire"];
// 4. add the cell to the layer and we're done
self.fireEmitter.emitterCells = [NSArray arrayWithObject:fire];
}
....
*********************************************************
3. 編譯並執行:
看起來像是一個橘色的汙點.

---------------------------------------------------------------------------------------
調整1:
....
-(void)awakeFromNib
{
....
//@add for more dynamic
//
// velocity(速度): 粒子在每個像素上每秒移動的速度.
// 在此, 會讓 cell 朝向螢幕的右邊發射粒子.
fire.velocity = 10;
// velocityRange(速度的變化範圍)
fire.velocityRange = 20;
// emissionRange(發射角度, 弧度):
// 在此設為: PI / 2 = 90 度
fire.emissionRange = M_PI_2;
// name(名稱): 你可以為要發射的 cell 設定一個名稱,
// 以便在之後方便查找和修改屬性.
[fire setName:@"fire"];
// 4. add the cell to the layer and we're done
self.fireEmitter.emitterCells = [NSArray arrayWithObject:fire];
}
....
編譯並執行:
 調整2:
調整2:
....
-(void)awakeFromNib
{
....
//@add for more dynamic
//
// velocity(速度): 粒子在每個像素上每秒移動的速度.
// 在此, 會讓 cell 朝向螢幕的右邊發射粒子.
fire.velocity = 10;
// velocityRange(速度的變化範圍)
fire.velocityRange = 20;
// emissionRange(發射角度, 弧度):
// 在此設為: PI / 2 = 90 度
fire.emissionRange = M_PI_2;
// ScaleSpeed(速度的縮放比率)
fire.scaleSpeed = 0.3;
// spin(旋轉, 自旋): 每個粒子的旋轉速度.
fire.spin = 0.5;
// name(名稱): 你可以為要發射的 cell 設定一個名稱,
// 以便在之後方便查找和修改屬性.
[fire setName:@"fire"];
// 4. add the cell to the layer and we're done
self.fireEmitter.emitterCells = [NSArray arrayWithObject:fire];
}
....
編譯並執行:
 調整3: 設定渲染模式
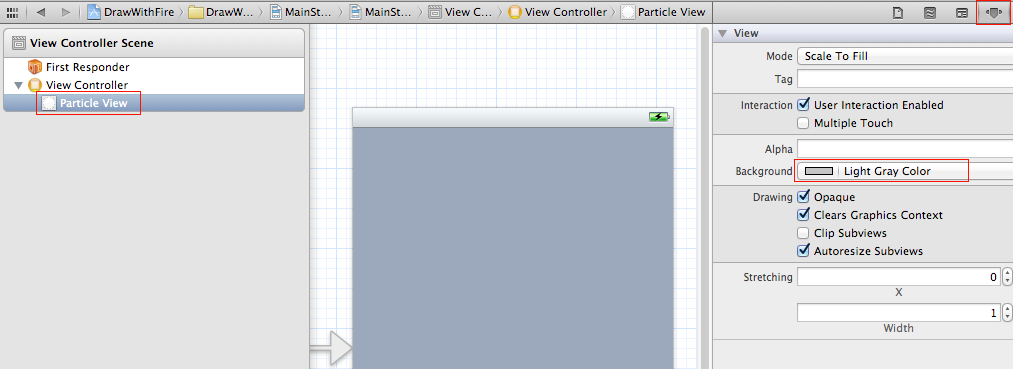
a. 先將背景調成灰色:
開啟 MainStoryboard.storyboard 檔案, 先點選左方 View Controller 下的
Particle View, 再點選右方的 "Identity Inspector", 將下方的 Background
改選為: Light Gray Color.
 b. 設定渲染模式:
....
-(void)awakeFromNib
{
// 1. Set ref to the layer
self.fireEmitter = (CAEmitterLayer *)self.layer;
// 2. Configure the emitter layer
//
// set the position of the emitter
self.fireEmitter.emitterPosition = CGPointMake(50, 50);
// set the size of the particles to spawn
self.fireEmitter.emitterSize = CGSizeMake(10, 10);
//@add for renderMode
//
// additive render mode(遞增渲染模式):
// 1) 不再以普通的方式: 一個覆蓋住另一個來繪製粒子.
// 2) 改成: 當粒子有重疊的話, 顏色強度會增加.
// 3) 所以你會看到: 粒子的發射區域內為沸騰般的白色物質;
// 而在區域外面則為火球, 因為在那裡粒子因滅亡而減少數量,
// 色彩蛻變到原始鐵鏽般的顏色.
self.fireEmitter.renderMode = kCAEmitterLayerAdditive;
....
}
....
編譯並執行:

---------------------------------------------------------------------------------------
#import <UIKit/UIKit.h>
@interface DWFParticleView : UIView
//@add
- (void)setEmitterPositionFromTouch:(UITouch *)t;
@end
2. 開啟 DWFParticleView.m 檔案, 修改如下:
....
//@add
- (void)setEmitterPositionFromTouch:(UITouch *)t
{
//change the emitter's position
self.fireEmitter.emitterPosition = [t locationInView:self];
}
@end
3. 開啟 ViewController.h 檔案, 修改如下:
#import <UIKit/UIKit.h>
//@add
#import "DWFParticleView.h"
@interface ViewController : UIViewController
{
//@add
IBOutlet DWFParticleView *fireView;
}
@end
4. 開啟 MainStoryboard.storyboard 檔案, 設定如下:
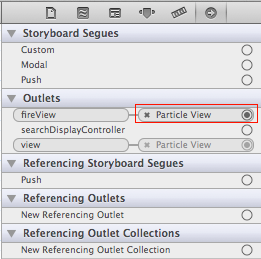
先點選 UI 左方的 "View Controller", 再點選右方的 "Connections Inspector",
於下方的 Outlets 點選 "fireView" 右邊的空心圈圈, 拖拉到最左邊
"Particle View" 上.

結果如下: "Outlet" fireView 連結到 "Particle View".
 5. 開啟 ViewController.m 檔案, 修改如下:
....
//@add
- (void)touchesMoved:(NSSet *)touches withEvent:(UIEvent *)event {
[fireView setEmitterPositionFromTouch: [touches anyObject]];
}
@end
6. 編譯並執行:
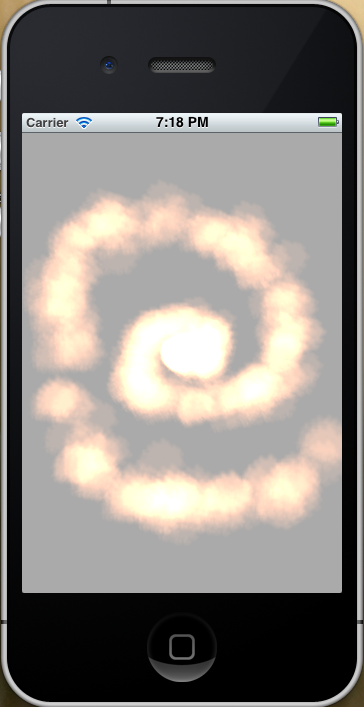
對螢幕碰觸並拖曳, 就可以看到粒子的發射效果, 並且在移動的軌跡留下火焰.
 ---------------------------------------------------------------------------------------
....
-(void)awakeFromNib
{
....
// birthRate(出生率): 每秒發射出的粒子數目. 對於一個好的火焰或瀑布粒子而言,
// 最少需要幾百個粒子, 所以在此設為 200.
//fire.birthRate = 200;
//@update: 一開始先不要產生粒子
fire.birthRate = 0;
}
....
2. 開啟 DWFParticleView.h 檔案, 修改如下:
#import <UIKit/UIKit.h>
@interface DWFParticleView : UIView
//@add
- (void)setEmitterPositionFromTouch:(UITouch *)t;
//@add: to turn on and off emitting
-(void)setIsEmitting:(BOOL)isEmitting;
@end
3. 開啟 DWFParticleView.m 檔案, 修改如下:
....
//@add
-(void)setIsEmitting:(BOOL)isEmitting
{
// turn on/off the emitting of particles
[self.fireEmitter setValue:[NSNumber numberWithInt:isEmitting?200:0]
forKeyPath:@"emitterCells.fire.birthRate"];
}
// 說明: 之前已為此 CAEmitterCell 設定名稱.
// [fire setName:@"fire"];
@end
4. 開啟 ViewController.m 檔案, 修改如下:
....
//@add
- (void)touchesMoved:(NSSet *)touches withEvent:(UIEvent *)event {
[fireView setEmitterPositionFromTouch: [touches anyObject]];
}
//@add
- (void)touchesBegan:(NSSet *)touches withEvent:(UIEvent *)event {
[fireView setEmitterPositionFromTouch: [touches anyObject]];
[fireView setIsEmitting:YES];
}
//@add
- (void)touchesEnded:(NSSet *)touches withEvent:(UIEvent *)event {
[fireView setIsEmitting:NO];
}
//@add
- (void)touchesCancelled:(NSSet *)touches withEvent:(UIEvent *)event {
[fireView setIsEmitting:NO];
}
@end
5. 編譯並執行:
當手碰觸到螢幕時, 才會開始產生粒子.

update: 2012/07/10
reference:
UIKit Particle Systems in iOS 5 Tutorial | Ray Wenderlich
A. 說明
使用粒子系統的例子:
1. UIKit games:
你可以完全只使用 UIKit 來製作遊戲(如紙牌類的遊戲, 運作的相當不錯).
現在, 你可以使用爆炸, 煙霧等效果來使遊戲有更佳的體驗.
2. Slick(圓滑的) UI effects:
當使用者在螢幕上移動一個物體時, 可以留下拖曳的煙霧效果.
3. Stunning(令人震驚的) screen transitions(轉變):
在 App 顯示下一個螢幕時, 讓之前的畫面消失在火球之中.
---------------------------------------------------------------------------------------
B. 粒子 APIs
1. 有二個在 QuartzCore 框架中的類別, 可供使用來建立粒子系統, 分別是:
CAEmitterLayer 與 CAEmitterCell.
備註:
a. CAEmitterLayer Class Reference:
CAEmitterLayer 類別提供一個 Core Animation 的粒子發射(emitter)系統.
粒子藉由
CAEmitterCell 的實體來定義. 粒子將會被繪製在 layer 的背景色之上與 layer 的邊緣(border)之上.
CAEmitterCell 類別用來在 CAEmitterLayer 中將一個粒子來源發射出去.
Emitter cell 定義了發射的方向與發射粒子的相關屬性. Emitter cells 可以
有存放 sub-cells 的陣列, 這使得粒子本身可以再發射粒子.
*********************************************************
2. 一般的概念是, 先建立一個 CAEmitterLayer, 將一個或多個 CAEmitterCells
加入其中. 每個 cell 會依照各自的設定來產生粒子效果.
3. 並且, 因為 CAEmitterLayer 是繼承自 CALayer, 你可以在 UIKit 的任何階層
(hierarchy)中輕易地來引入使用.
4. 我覺得這個新的 UIKit 粒子系統最酷的事情是: 單一的 CAEmitterLayer 可以
持有很多個 CAEmitterCells. 這使你可以完成一些很複雜的極酷特效. 例如,
如果要建立一個噴水池, 你可以用一個 cell 發射水滴粒子, 並且用另一個 cell
在噴水池上方發射水蒸氣粒子.
---------------------------------------------------------------------------------------
C. 建立專案
1. Xcode > File > New > Project... > iOS > Application > Single View Application > Next
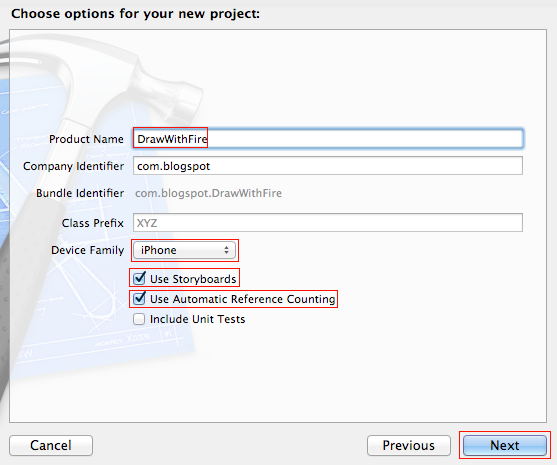
Product Name: DrawWithFire
Company Identifier: com.blogspot
Device Family: iPhone
Use Storyboards: checked
Use Automatic Reference Counting: checked
> Next > Create
Company Identifier: com.blogspot
Device Family: iPhone
Use Storyboards: checked
Use Automatic Reference Counting: checked
> Next > Create
*********************************************************
2. 加入以下的 Framework:
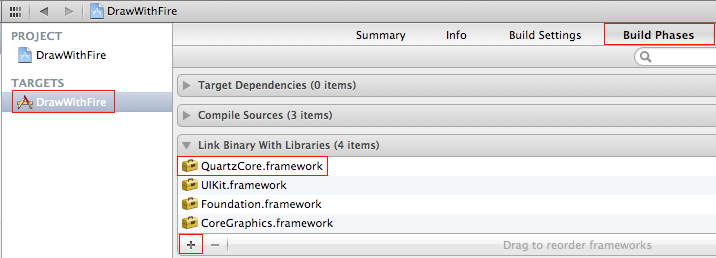
QuartzCore
- Supports image processing and video image manipulation.
- Supports image processing and video image manipulation.
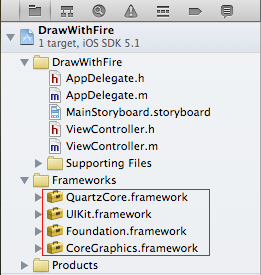
備註: 目前專案的 Framework 如下:
D. 客製化 UIView 類別 (將 CAEmitterLayer 作為 UIView 的 layer)
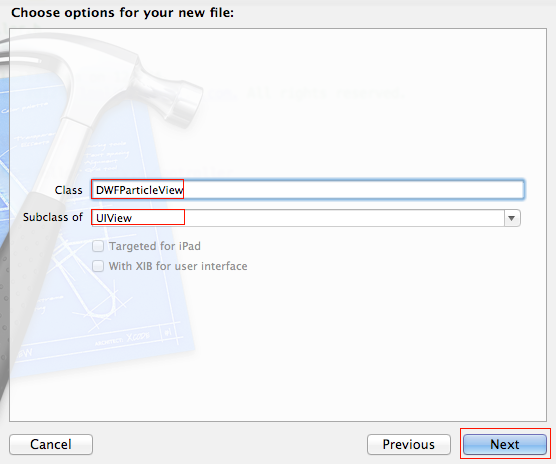
1. Xcode > File > New > New File...
iOS > Cocoa Touch > Objective-C class > Next
Class: DWFParticleView
Subclass of: UIView
> Next > Create
*********************************************************
2. 開啟 DWFParticleView.m 檔案, 修改如下:
//@add
#import <QuartzCore/QuartzCore.h>
//@add
@interface DWFParticleView ()
{
CAEmitterLayer *fireEmitter;
}
@property (nonatomic, strong) CAEmitterLayer *fireEmitter;
@end
@implementation DWFParticleView
//@add
@synthesize fireEmitter = _fireEmitter;
- (id)initWithFrame:(CGRect)frame
{
self = [super initWithFrame:frame];
if (self) {
// Initialization code
}
return self;
}
/*
// Only override drawRect: if you perform custom drawing.
// An empty implementation adversely affects performance during animation.
- (void)drawRect:(CGRect)rect
{
// Drawing code
}
*/
//@add
-(void)awakeFromNib
{
//set ref to the layer
self.fireEmitter = (CAEmitterLayer *)self.layer;
}
//@add: overwriting
+ (Class)layerClass
{
//configure the UIView to have emitter layer
return [CAEmitterLayer class];
}
@end
*********************************************************
3. 將 view controller 的 root view 設為 DWFParticleView:
開啟 MainStoryboard.storyboard 檔案, 修改如下:
選取左方 View Controller 下的 UIView
> 點選右上方的 "Identity inspector"
> 將 Class 由 UIView 改選為 DWFParticleView.

---------------------------------------------------------------------------------------
E. 基本粒子測試
1. 說明:為了要發射出火焰, 煙霧, 瀑布等等, 你需要有一個 PNG 檔案來作為粒子的起始.
原作者提供一個 PNG 檔案下載, 請將其加入到專案裡. 這個粒子檔案大小為:
32×32 pixels, 具透明度, 僅使用有點古怪的白色筆刷來隨機繪製. 對粒子而言,
粒子的發射器最佳的顏色就是白色的, 它可以讓我們將想要的顏色畫在所提供的
圖像上. 建立半透明的粒子圖像也是個不錯的想法, 如此一來, 粒子系統就可以
藉由粒子本身來作混合.
*********************************************************
2. 開啟 DWFParticleView.m 檔案, 修改如下:
....
-(void)awakeFromNib
{
// 1. Set ref to the layer
self.fireEmitter = (CAEmitterLayer *)self.layer;
// 2. Configure the emitter layer
//
// set the position of the emitter
self.fireEmitter.emitterPosition = CGPointMake(50, 50);
// set the size of the particles to spawn
self.fireEmitter.emitterSize = CGSizeMake(10, 10);
// 3. Add a CAEmitterCell to the CAEmitterLayer
//
// creating a cell instance
CAEmitterCell *fire = [CAEmitterCell emitterCell];
// birthRate(出生率): 每秒發射出的粒子數目. 對於一個好的火焰或瀑布粒子而言,
// 最少需要幾百個粒子, 所以在此設為 200.
fire.birthRate = 200;
// lifetime(壽命): 粒子消失前的存活秒數, 所以在此設為 3.0.
fire.lifetime = 3.0;
// lifetimeRange(壽命的變化範圍): 系統會在 (lifetime – lifetimeRange,
// lifetime + lifetimeRange) 這個範圍內, 隨機取得粒子的壽命時間.
// 因此, 在此例中, 粒子的壽命時間介於 2.5 ~ 3.5 秒之間.
fire.lifetimeRange = 0.5;
// color(顏色): 粒子內容的著色效果. 在此選擇橘色.
fire.color = [[UIColor colorWithRed:0.8 green:0.4 blue:0.2 alpha:0.1] CGColor];
// contents(內容): 提供給發射的 cell 使用的內容, 通常是一個 CGImage 物件.
// 在此設為粒子圖像.
fire.contents = (id)[[UIImage imageNamed:@"Particles_fire.png"] CGImage];
// name(名稱): 你可以為要發射的 cell 設定一個名稱, 以便在之後方便查找
// 和修改屬性.
[fire setName:@"fire"];
// 4. add the cell to the layer and we're done
self.fireEmitter.emitterCells = [NSArray arrayWithObject:fire];
}
....
*********************************************************
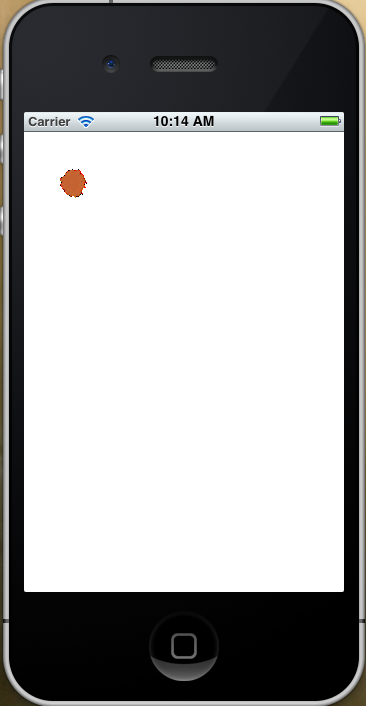
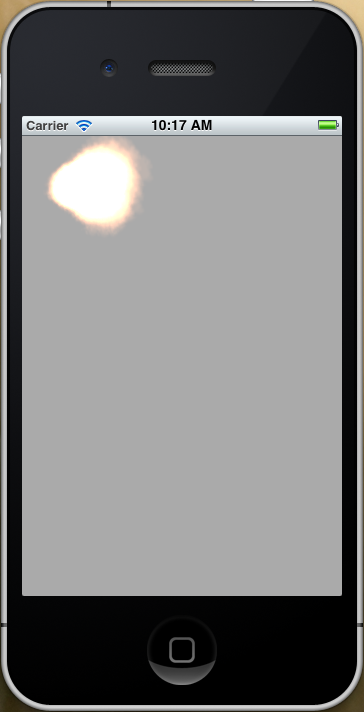
3. 編譯並執行:
看起來像是一個橘色的汙點.
---------------------------------------------------------------------------------------
F. 讓粒子效果更加生動
開啟 DWFParticleView.m 檔案, 修改如下: 調整1:
....
-(void)awakeFromNib
{
....
//@add for more dynamic
//
// velocity(速度): 粒子在每個像素上每秒移動的速度.
// 在此, 會讓 cell 朝向螢幕的右邊發射粒子.
fire.velocity = 10;
// velocityRange(速度的變化範圍)
fire.velocityRange = 20;
// emissionRange(發射角度, 弧度):
// 在此設為: PI / 2 = 90 度
fire.emissionRange = M_PI_2;
// name(名稱): 你可以為要發射的 cell 設定一個名稱,
// 以便在之後方便查找和修改屬性.
[fire setName:@"fire"];
// 4. add the cell to the layer and we're done
self.fireEmitter.emitterCells = [NSArray arrayWithObject:fire];
}
....
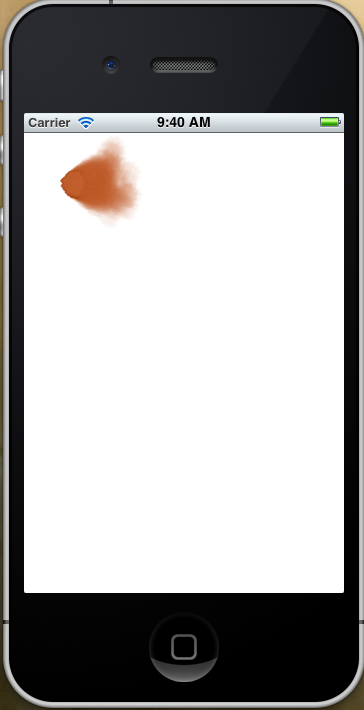
編譯並執行:
....
-(void)awakeFromNib
{
....
//@add for more dynamic
//
// velocity(速度): 粒子在每個像素上每秒移動的速度.
// 在此, 會讓 cell 朝向螢幕的右邊發射粒子.
fire.velocity = 10;
// velocityRange(速度的變化範圍)
fire.velocityRange = 20;
// emissionRange(發射角度, 弧度):
// 在此設為: PI / 2 = 90 度
fire.emissionRange = M_PI_2;
// ScaleSpeed(速度的縮放比率)
fire.scaleSpeed = 0.3;
// spin(旋轉, 自旋): 每個粒子的旋轉速度.
fire.spin = 0.5;
// name(名稱): 你可以為要發射的 cell 設定一個名稱,
// 以便在之後方便查找和修改屬性.
[fire setName:@"fire"];
// 4. add the cell to the layer and we're done
self.fireEmitter.emitterCells = [NSArray arrayWithObject:fire];
}
....
編譯並執行:
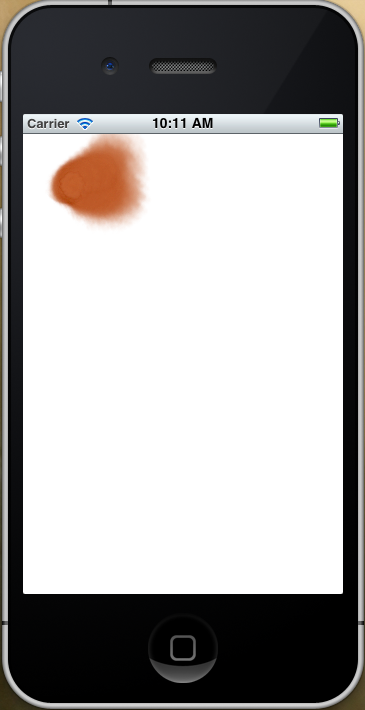
a. 先將背景調成灰色:
開啟 MainStoryboard.storyboard 檔案, 先點選左方 View Controller 下的
Particle View, 再點選右方的 "Identity Inspector", 將下方的 Background
改選為: Light Gray Color.
....
-(void)awakeFromNib
{
// 1. Set ref to the layer
self.fireEmitter = (CAEmitterLayer *)self.layer;
// 2. Configure the emitter layer
//
// set the position of the emitter
self.fireEmitter.emitterPosition = CGPointMake(50, 50);
// set the size of the particles to spawn
self.fireEmitter.emitterSize = CGSizeMake(10, 10);
//@add for renderMode
//
// additive render mode(遞增渲染模式):
// 1) 不再以普通的方式: 一個覆蓋住另一個來繪製粒子.
// 2) 改成: 當粒子有重疊的話, 顏色強度會增加.
// 3) 所以你會看到: 粒子的發射區域內為沸騰般的白色物質;
// 而在區域外面則為火球, 因為在那裡粒子因滅亡而減少數量,
// 色彩蛻變到原始鐵鏽般的顏色.
self.fireEmitter.renderMode = kCAEmitterLayerAdditive;
....
}
....
編譯並執行:
---------------------------------------------------------------------------------------
G. 觸碰火焰
1. 開啟 DWFParticleView.h 檔案, 修改如下:#import <UIKit/UIKit.h>
@interface DWFParticleView : UIView
//@add
- (void)setEmitterPositionFromTouch:(UITouch *)t;
@end
2. 開啟 DWFParticleView.m 檔案, 修改如下:
....
//@add
- (void)setEmitterPositionFromTouch:(UITouch *)t
{
//change the emitter's position
self.fireEmitter.emitterPosition = [t locationInView:self];
}
@end
3. 開啟 ViewController.h 檔案, 修改如下:
#import <UIKit/UIKit.h>
//@add
#import "DWFParticleView.h"
@interface ViewController : UIViewController
{
//@add
IBOutlet DWFParticleView *fireView;
}
@end
4. 開啟 MainStoryboard.storyboard 檔案, 設定如下:
先點選 UI 左方的 "View Controller", 再點選右方的 "Connections Inspector",
於下方的 Outlets 點選 "fireView" 右邊的空心圈圈, 拖拉到最左邊
"Particle View" 上.
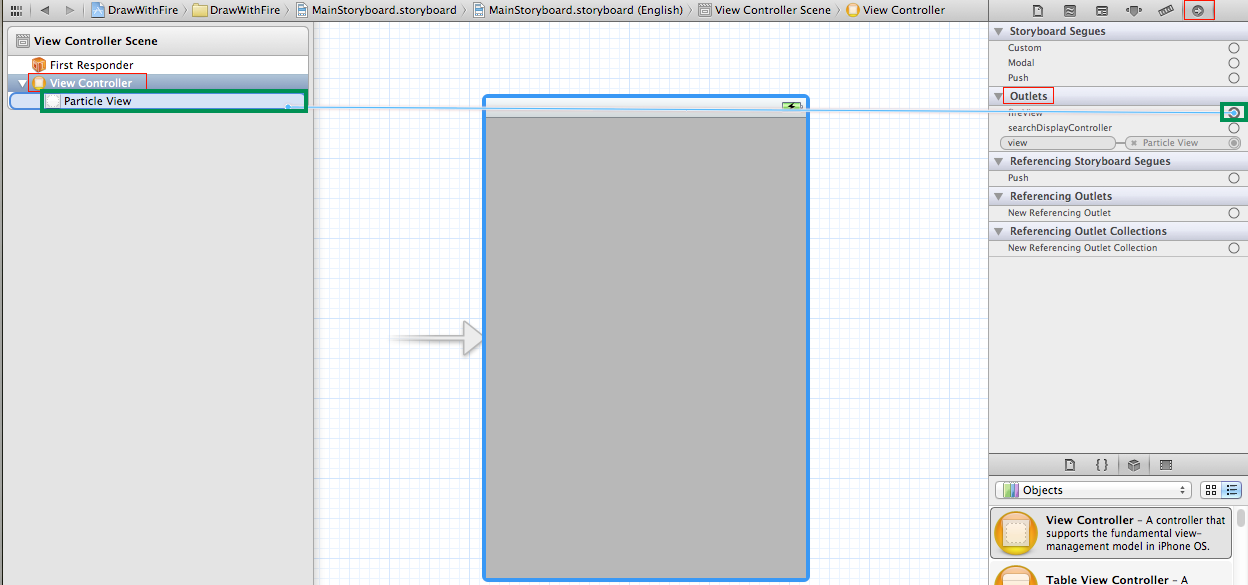
結果如下: "Outlet" fireView 連結到 "Particle View".
....
//@add
- (void)touchesMoved:(NSSet *)touches withEvent:(UIEvent *)event {
[fireView setEmitterPositionFromTouch: [touches anyObject]];
}
@end
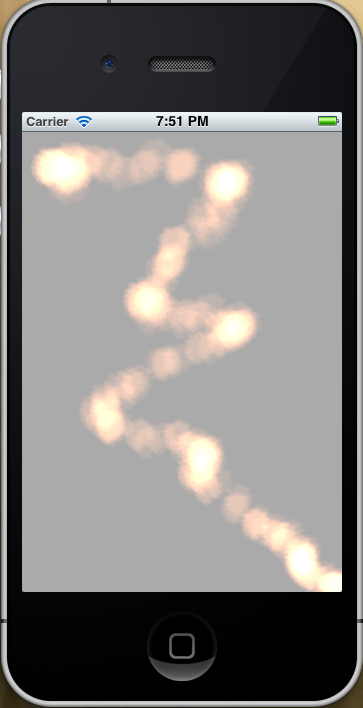
6. 編譯並執行:
對螢幕碰觸並拖曳, 就可以看到粒子的發射效果, 並且在移動的軌跡留下火焰.
H. 動態地修改 Cells
1. 開啟 DWFParticleView.m 檔案, 修改如下:....
-(void)awakeFromNib
{
....
// birthRate(出生率): 每秒發射出的粒子數目. 對於一個好的火焰或瀑布粒子而言,
// 最少需要幾百個粒子, 所以在此設為 200.
//fire.birthRate = 200;
//@update: 一開始先不要產生粒子
fire.birthRate = 0;
}
....
2. 開啟 DWFParticleView.h 檔案, 修改如下:
#import <UIKit/UIKit.h>
@interface DWFParticleView : UIView
//@add
- (void)setEmitterPositionFromTouch:(UITouch *)t;
//@add: to turn on and off emitting
-(void)setIsEmitting:(BOOL)isEmitting;
@end
3. 開啟 DWFParticleView.m 檔案, 修改如下:
....
//@add
-(void)setIsEmitting:(BOOL)isEmitting
{
// turn on/off the emitting of particles
[self.fireEmitter setValue:[NSNumber numberWithInt:isEmitting?200:0]
forKeyPath:@"emitterCells.fire.birthRate"];
}
// 說明: 之前已為此 CAEmitterCell 設定名稱.
// [fire setName:@"fire"];
@end
4. 開啟 ViewController.m 檔案, 修改如下:
....
//@add
- (void)touchesMoved:(NSSet *)touches withEvent:(UIEvent *)event {
[fireView setEmitterPositionFromTouch: [touches anyObject]];
}
//@add
- (void)touchesBegan:(NSSet *)touches withEvent:(UIEvent *)event {
[fireView setEmitterPositionFromTouch: [touches anyObject]];
[fireView setIsEmitting:YES];
}
//@add
- (void)touchesEnded:(NSSet *)touches withEvent:(UIEvent *)event {
[fireView setIsEmitting:NO];
}
//@add
- (void)touchesCancelled:(NSSet *)touches withEvent:(UIEvent *)event {
[fireView setIsEmitting:NO];
}
@end
5. 編譯並執行:
當手碰觸到螢幕時, 才會開始產生粒子.
全站熱搜

 留言列表
留言列表

