close
Git 單一開發者與遠端備份機制
更新日期: 2011/05/12
參考資料:
1. I touchs: Using git in Xcode 4
2. 竹林七賢: Git 遠端備份
一. 環境:
A. Mac OS X: 10.6.7 Snow Leopard
B. Xcode: 4.0.2
二. 安裝 Git:
A. 打開終端機, 檢查是否有安裝 Git, 以及其版本.
$git --version
git version 1.7.3.4
B. 下載並安裝 Git:
http://git-scm.com/download
1. 在此採用版本: git-1.7.5-x86_64-leopard
2. 掛載後, 有 4 個檔案:
a. README.txt - 說明文件
b. setup git PATH for non-terminal programs.sh -
執行後, 將 git 的安裝路徑 /usr/local/git 加到 ~/.MacOSX/environment.plist 裡,
可讓非終端程式找到 git , 需登出再登入才會生效.
c. uninstall.sh - 反安裝
d. git-1.7.5-x86_64-leopard.pkg - 安裝程式(下次再安裝最新版的, 就自動更新了)
三. 用 Xcode 4 建立一個 Workspace (選擇性):
A. 特點:
1. 方便組織多個專案.
2. 可以在同一個地方幫多個專案 commit changes.
3. Xcode 4 Workspace 允許在單一個地方儲存: 你所有的
projects, documents, folders, schemes 的 links(連結),
它並沒有控制住實際的資料; 只是一種參照到
projects, folders, various documents 的自由集合.
B.步驟: 打開 Xcode 4 > File > New > New Workspace
瀏覽要存放的位置後, 然後給個名稱.
(在此: 路徑為 /Lanli/RD ; 名稱為: iOS4Workspace )
四. 建立 Local Repository:
步驟如下: $mkdir /Lanli/RD/iOS4_Projects $cd /Lanli/RD/iOS4_Projects
$git init
// msg: Initialized empty Git repository in /Lanli/RD/iOS4_Projects/.git/
$touch README
$git add README
$git commit -m 'first commit'
[master (root-commit) 1c71074] first commit 0 files changed, 0 insertions(+), 0 deletions(-) create mode 100644 README
說明:
1. 查看 git 的用法 -> git --help
2. git 的 online manual: Git User's Manual
五. 加入 Projects:
A. 用 Xcode 新增一個(或多個) projects 放在 四. 建立的 local repository 下:
Xcode 4 > File > New > New Project
瀏覽要存放的位置後, 然後給個名稱.
(在此: 路徑為 /Lanli/RD/iOS4_Projects ; 名稱為: helloBlock )
B. 將此專案加入 repository:
$cd /Lanli/RD/iOS4_Projects
$git add helloBlock
$git commit -m 'helloBlock project added'
[master b9e233f] helloBlock project added 13 files changed, 1212 insertions(+), 0 deletions(-) create mode 100644 helloBlock/helloBlock.xcodeproj/project.pbxproj......
說明: 先關閉 Xcode 4 , 再開啟.
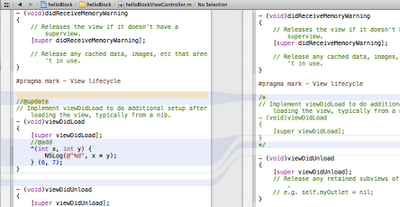
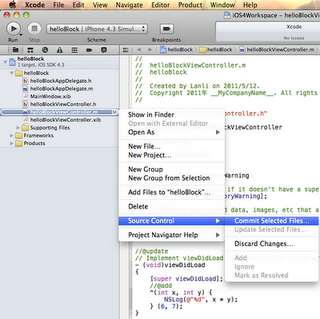
六. 當有修改 source code, 可執行:
select modified file (檔名右方會有一個 M 符號 ) > 右鍵 >
Source Control > Commit Select Files.
七. 遠端備份
A. 到 git 的目錄下執行:
$cd /Lanli/RD/iOS4_Projects
$git bundle create iOS4_Projects_BACKUP.BUNDLE --all
Counting objects: 30, done. Delta compression using up to 2 threads. Compressing objects: 100% (25/25), done. Writing objects: 100% (30/30), 10.10 KiB, done. Total 30 (delta 4), reused 0 (delta 0)
說明: iOS4_Projects_BACKUP.BUNDLE 是自行命名的檔名.
B. 將 iOS4_Projects_BACKUP.BUNDLE 上傳到 Google 文件上,
Google 文件本身也有版本控制的機制.
八. 從遠端的備份重建 local 的開發環境
A. 從 Google 文件下載 iOS4_Projects_BACKUP.BUNDLE 檔案.
B. 執行以下的步驟:
$cd /Lanli/RD
$git clone iOS4_Projects_BACKUP.BUNDLE iOS4_Projects
$cd iOS4_Projects
$git fetch
$git pull
說明: iOS4_Projects 為自定的新目錄名稱.
Using git in Xcode 4
更新日期: 2011/02/18
參考資料:
1. Version Control System with XCode 4 and Git Tutorial | Smart Apps
http://www.smartapps.co/2011/01/version-control-system-with-xcode-4-and-git-tutorial/
2. Help.GitHub - Generating SSH keys (OSX)
http://help.github.com/mac-key-setup/
3. Help.GitHub - Working with SSH key passphrases
http://help.github.com/working-with-key-passphrases/
4. gist: 830465 - gitignore file for Xcode Projects- GitHub
https://gist.github.com/830465
5. Sample .gitignore files for various projects
http://sujee.net/tech/articles/gitignore/
一. 環境:
1. Mac OS X: 10.6.6 Snow Leopard
2. Xcode: 4.0 GM (Golden Master)
3. Git: 1.7.4-x86_64-leopard
二. set up a remote depositor(貯藏所):
A. 在 Github.com 註冊一個賬號: Sign up for GitHub - GitHub
說明: free for public repositories; paid for private repositories.
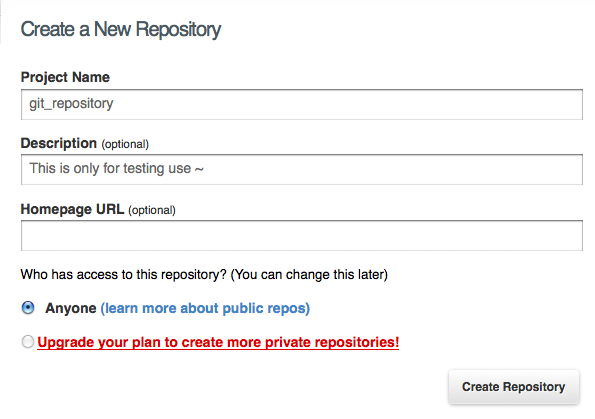
B. 建立一個新的 remote Repository:
進入 Create a New Repository , 建立一個新的 Repository:
說明: 在此 Project Name 為: git_repository, 會與 四. 所建立的
local repository 同名(可以用產品名稱來命名).

按下 Create Repository 後, 會出現相關步驟的說明, 這邊先參考, 之後就會作到.

C. Generating SSH keys on OS X:
1. 打開終端機, 先檢查 ssh key 目錄是否存在:
$ cd ~/.ssh
$ ls
說明: a. 此目錄下, 如果已有存在的 keypair (預設為: id_rsa, id_rsa.pub),
且想要使用的話, 就不必再產生一次.
b. 或者除了移除之前的 keypair 外, 也可以作備份:
$ mkdir key_backup
$ cp id_rsa* key_backup
$ rm -rf id_rsa*
c. ssh 預設會使用 ~/.ssh 目錄下, 名稱為以下的 keys:
id_rsa, id_dsa 或 identity.
2. 產生 RSA keypair:
$ ssh-keygen -t rsa -C "lanli0210@gmail.com"
Generating public/private rsa key pair.
Enter file in which to save the key (/Users/lanli/.ssh/id_rsa):
// 直接按 enter, 使用預設值即可
Enter passphrase (empty for no passphrase): // 輸入 passphrase
Enter same passphrase again: // 再次輸入 passphrase
Your identification has been saved in /Users/lanli/.ssh/id_rsa.
Your public key has been saved in /Users/lanli/.ssh/id_rsa.pub.
The key fingerprint is:
bf:96:7d:8a:16:f7:a7:93:b6:08:23:34:77:c0:b1:fe lanli0210@gmail.com
The key's randomart image is:
+--[ RSA 2048]----+
| . |
| . o |
| + |
| . . |
| S o . |
| . +.o. |
| . +=E. . |
| .+=..* .|
| oo o+o= |
+-----------------+
說明: 1. 這時用 ls 就可以看到二個檔案: id_rsa 與 id_rsa.pub
2. 如果不使用預設的 key names 或要將 keys 存放在別的目錄,
則需要執行: ssh-add path/to/my_key 讓 ssh 知道 keys 在哪裡.
D. Adding the key to your GitHub account:
1. 打開 Browser 進入: git hub account page
2. 先點選左邊 "SSH Public Keys", 再點 "add another public key"
3. 先從終端機 copy public key: id_rsa.pub 的內容到 clipboard(剪貼板):
$ cat ~/.ssh/id_rsa.pub | pbcopy
說明: 如此以確保 key 的內容不會包含換行或空白.
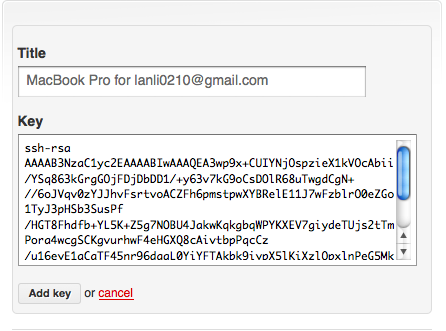
4. 在 Key 的欄位內貼上 public key 的內容: command + v
 5. 如果 Title 欄位留白未輸入的話, 預設會使用 key comment (your email)
當作 Title.
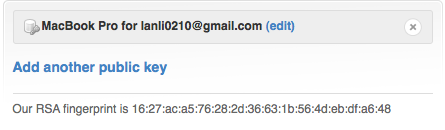
6. 接著按下: "Add key" 結果如下, 產生了一個 public key.
 E. 測試 key 是否正常運作: 用 ssh 連到 github.com
$ ssh git@github.com
The authenticity of host 'github.com (207.97.227.239)' can't be established.
RSA key fingerprint is 16:27:ac:a5:76:28:2d:36:63:1b:56:4d:eb:df:a6:48.
Are you sure you want to continue connecting (yes/no)? yes
Warning: Permanently added 'github.com,207.97.227.239' (RSA) to the list of known hosts.
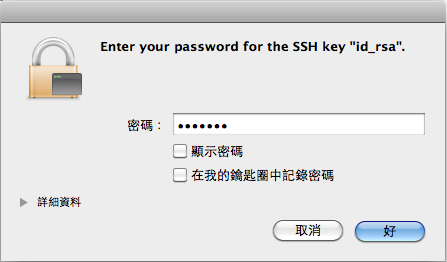
接著, 輸入密碼:
 Identity added: /Users/lanli/.ssh/id_rsa (/Users/lanli/.ssh/id_rsa)
PTY allocation request failed on channel 0
Hi lanli! You've successfully authenticated, but GitHub does not provide shell access. Connection to github.com closed.
說明: 有出現上方的 You've successfully authenticated 就代表成功了.
三. 用 Xcode 4 建立一個 Workspace (選擇性):
A. 特點: 1. 方便組織多個專案.
2. 可以在同一個地方幫多個專案 commit changes.
3. Xcode 4 Workspace 允許在單一個地方儲存: 你所有的
projects, documents, folders, schemes 的 links(連結),
它並沒有控制住實際的資料; 只是一種參照到
projects, folders, various documents 的自由集合.
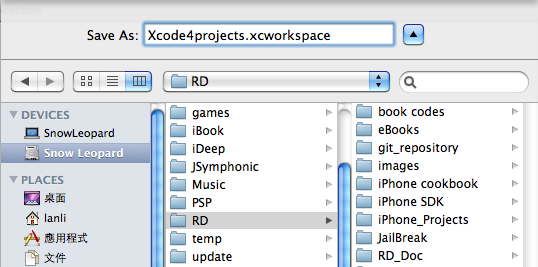
B.步驟: 打開 Xcode 4 > File > New > New Workspace
瀏覽要存放的位置後, 然後給個名稱.
(在此: 路徑為 /Lanli/RD ; 名稱為: Xcode4projects )

參考資料:
1. Version Control System with XCode 4 and Git Tutorial | Smart Apps
http://www.smartapps.co/2011/01/version-control-system-with-xcode-4-and-git-tutorial/
2. Help.GitHub - Generating SSH keys (OSX)
http://help.github.com/mac-key-setup/
3. Help.GitHub - Working with SSH key passphrases
http://help.github.com/working-with-key-passphrases/
4. gist: 830465 - gitignore file for Xcode Projects- GitHub
https://gist.github.com/830465
5. Sample .gitignore files for various projects
http://sujee.net/tech/articles/gitignore/
一. 環境:
1. Mac OS X: 10.6.6 Snow Leopard
2. Xcode: 4.0 GM (Golden Master)
3. Git: 1.7.4-x86_64-leopard
二. set up a remote depositor(貯藏所):
A. 在 Github.com 註冊一個賬號: Sign up for GitHub - GitHub
說明: free for public repositories; paid for private repositories.
B. 建立一個新的 remote Repository:
進入 Create a New Repository , 建立一個新的 Repository:
說明: 在此 Project Name 為: git_repository, 會與 四. 所建立的
local repository 同名(可以用產品名稱來命名).
按下 Create Repository 後, 會出現相關步驟的說明, 這邊先參考, 之後就會作到.
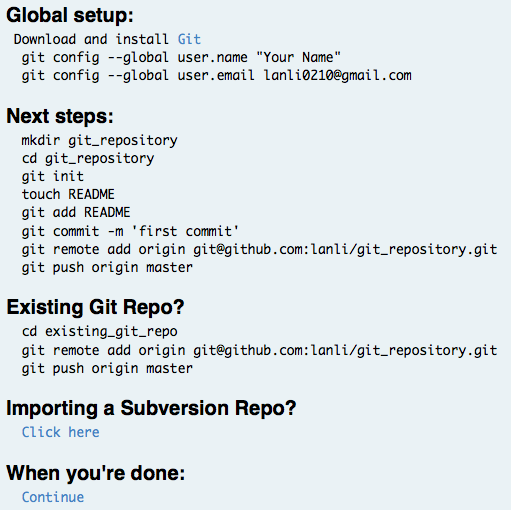
備註: 二個超連結
Importing a Subversion Repo? Click here
When you're done: Continue
// https://github.com/your-account/git_repository
Importing a Subversion Repo? Click here
When you're done: Continue
// https://github.com/your-account/git_repository
C. Generating SSH keys on OS X:
1. 打開終端機, 先檢查 ssh key 目錄是否存在:
$ cd ~/.ssh
$ ls
說明: a. 此目錄下, 如果已有存在的 keypair (預設為: id_rsa, id_rsa.pub),
且想要使用的話, 就不必再產生一次.
b. 或者除了移除之前的 keypair 外, 也可以作備份:
$ mkdir key_backup
$ cp id_rsa* key_backup
$ rm -rf id_rsa*
c. ssh 預設會使用 ~/.ssh 目錄下, 名稱為以下的 keys:
id_rsa, id_dsa 或 identity.
2. 產生 RSA keypair:
$ ssh-keygen -t rsa -C "lanli0210@gmail.com"
Generating public/private rsa key pair.
Enter file in which to save the key (/Users/lanli/.ssh/id_rsa):
// 直接按 enter, 使用預設值即可
Enter passphrase (empty for no passphrase): // 輸入 passphrase
Enter same passphrase again: // 再次輸入 passphrase
Your identification has been saved in /Users/lanli/.ssh/id_rsa.
Your public key has been saved in /Users/lanli/.ssh/id_rsa.pub.
The key fingerprint is:
bf:96:7d:8a:16:f7:a7:93:b6:08:23:34:77:c0:b1:fe lanli0210@gmail.com
The key's randomart image is:
+--[ RSA 2048]----+
| . |
| . o |
| + |
| . . |
| S o . |
| . +.o. |
| . +=E. . |
| .+=..* .|
| oo o+o= |
+-----------------+
說明: 1. 這時用 ls 就可以看到二個檔案: id_rsa 與 id_rsa.pub
2. 如果不使用預設的 key names 或要將 keys 存放在別的目錄,
則需要執行: ssh-add path/to/my_key 讓 ssh 知道 keys 在哪裡.
D. Adding the key to your GitHub account:
1. 打開 Browser 進入: git hub account page
2. 先點選左邊 "SSH Public Keys", 再點 "add another public key"
3. 先從終端機 copy public key: id_rsa.pub 的內容到 clipboard(剪貼板):
$ cat ~/.ssh/id_rsa.pub | pbcopy
說明: 如此以確保 key 的內容不會包含換行或空白.
4. 在 Key 的欄位內貼上 public key 的內容: command + v
當作 Title.
6. 接著按下: "Add key" 結果如下, 產生了一個 public key.
$ ssh git@github.com
The authenticity of host 'github.com (207.97.227.239)' can't be established.
RSA key fingerprint is 16:27:ac:a5:76:28:2d:36:63:1b:56:4d:eb:df:a6:48.
Are you sure you want to continue connecting (yes/no)? yes
Warning: Permanently added 'github.com,207.97.227.239' (RSA) to the list of known hosts.
接著, 輸入密碼:
PTY allocation request failed on channel 0
Hi lanli! You've successfully authenticated, but GitHub does not provide shell access. Connection to github.com closed.
說明: 有出現上方的 You've successfully authenticated 就代表成功了.
三. 用 Xcode 4 建立一個 Workspace (選擇性):
A. 特點: 1. 方便組織多個專案.
2. 可以在同一個地方幫多個專案 commit changes.
3. Xcode 4 Workspace 允許在單一個地方儲存: 你所有的
projects, documents, folders, schemes 的 links(連結),
它並沒有控制住實際的資料; 只是一種參照到
projects, folders, various documents 的自由集合.
B.步驟: 打開 Xcode 4 > File > New > New Workspace
瀏覽要存放的位置後, 然後給個名稱.
(在此: 路徑為 /Lanli/RD ; 名稱為: Xcode4projects )
四. 建立 Local Repository:
A. 下載並安裝 Git: http://git-scm.com/download
在此採用版本: git-1.7.4-x86_64-leopard
B. 打開終端機, 告訴 Git 你的 user name 跟 email:
$ git config --global user.name "Lanli Chen"
$ git config --global user.email lanli0210@gmail.com
C. 建立一個新的 local repository:
說明: 1. 之後的 projects 也會建在此目錄下.
2. 可將產品名稱當成 repository 的目錄名稱;
此目錄下再建立多個與該產品相關的專案.
$ mkdir /Lanli/RD/git_repository
$ cd /Lanli/RD/git_repository
$ git init
// msg: Initialized empty Git repository in /Lanli/RD/git_repository/.git/
$ touch README
$ git add README
$ git commit -m 'first commit'
[master (root-commit) 3dbca1d] first commit
0 files changed, 0 insertions(+), 0 deletions(-)
create mode 100644 README
說明: 1. 查看 git 的用法 -> git --help
2. git 的 online manual: Git User's Manual
$ cd /Lanli/RD/git_repository
$ touch .gitignore
$ vi .gitignore
加入以下的內容:
存檔並退出.
B. .gitattributes 檔設定
$ cd /Lanli/RD/git_repository
$ touch .gitattributes
$ vi .gitattributes
加入以下的內容:
*.pbxproj -crlf -diff -merge
存檔並退出.
說明: The line in .gitattributes treats your Xcode project file as a binary. This prevents Git from trying to fix newlines, show it in diffs, and excludes it from merges.Note that you will still see it shown as a conflict in merges, although the file won't have changed. Simply commit it and things should be good.
Xcode 4 > File > New > New Project
瀏覽要存放的位置後, 然後給個名稱.
(在此: 路徑為 /Lanli/RD/git_repository ; 名稱為: helloGit )
B. 將此專案加入 repository:
$ cd /Lanli/RD/git_repository
$ git add helloGit
$ git commit -m 'helloGit project added'
[master 0459168] helloGit project added
18 files changed, 1484 insertions(+), 0 deletions(-)
create mode 100644 helloGit/helloGit.xcodeproj/project.pbxproj
create mode 100644 helloGit/helloGit.xcodeproj/xcuserdata/lanli.xcuserdatad/xcschemes/helloGit.xcscheme
......
$ cd /Lanli/RD/git_repository
$ git remote add origin git@github.com:lanli/git_repository.git
// 如果出現訊息: fatal: remote origin already exists.
// 先執行: git remote rm origin ; 然後再重新 add 一次此步驟.
$ git push origin master
Counting objects: 31, done.
Delta compression using up to 2 threads.
Compressing objects: 100% (25/25), done.
Writing objects: 100% (31/31), 11.42 KiB, done.
Total 31 (delta 3), reused 0 (delta 0)
To git@github.com:lanli/git_repository.git
* [new branch] master -> master
B. 接著便可以 refresh account page, 並進入 Public Repositories 內的專案.

C. 點進 git_repository 裡看看:
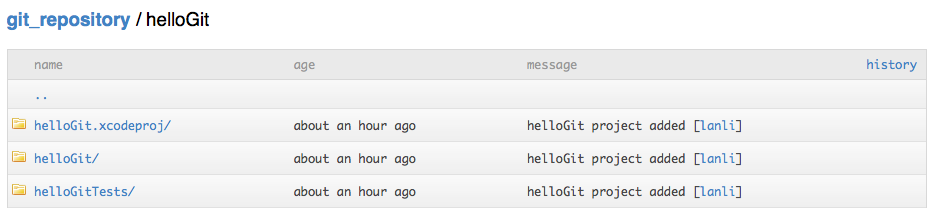
 D. 可再點進 helloGit 裡看看:
可看到所有從 local repository 所 commits 進來的檔案.

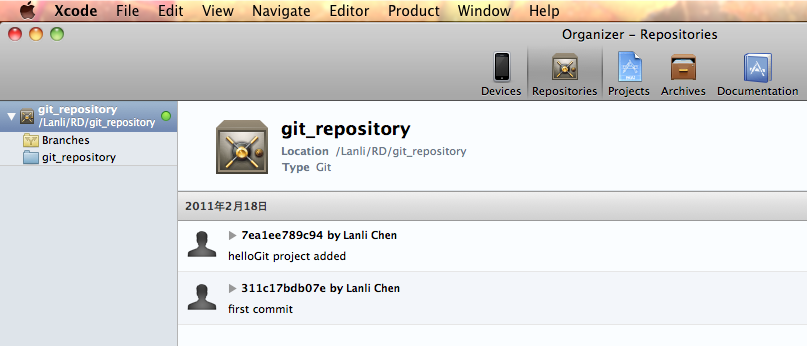
Xcode 4 > 右上方 Organizer > 切到 Repositories tab , 會看到 local repository,
圖中有顯示:
Location /Lanli/RD/git_repository
Type Git
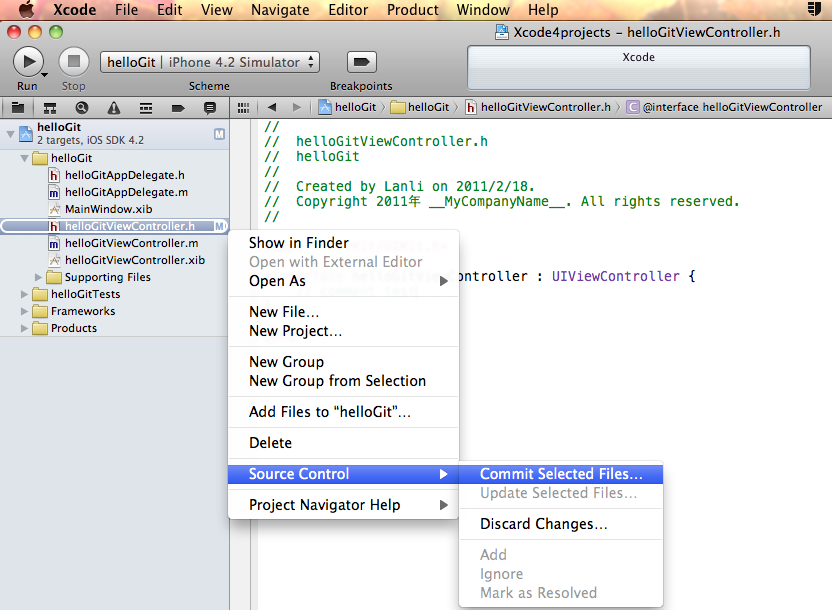
 B. 當有修改 source code, 可先執行 local 的 commit:
select modified file (檔名右方會有一個 M 符號 ) > 右鍵 >
Source Control > Commit Select Files.
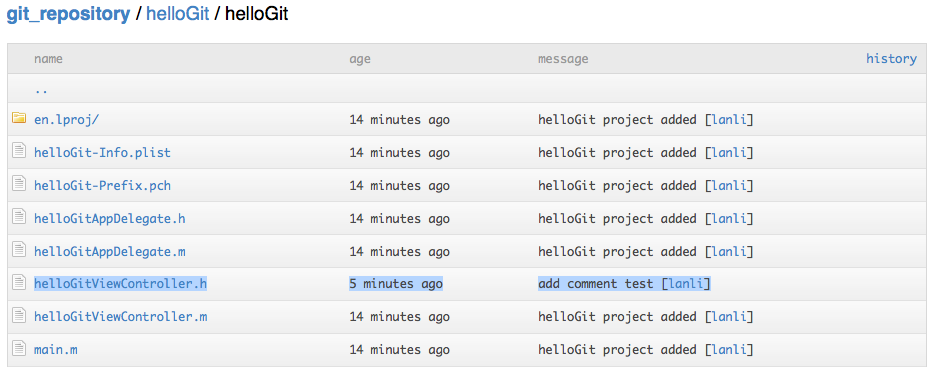
 C. 同步更新到 remote repository:
$ cd /Lanli/RD/git_repository
$ git push origin master
說明: 更新 remote Repository 的專案後可看到:
name age message
helloGitViewController.h 5 minutes ago add comment test
 D. 如果要從 remote repository 取得最新的版本:
$ cd /Lanli/RD/git_repository
$ git pull origin master
在此採用版本: git-1.7.4-x86_64-leopard
B. 打開終端機, 告訴 Git 你的 user name 跟 email:
$ git config --global user.name "Lanli Chen"
$ git config --global user.email lanli0210@gmail.com
C. 建立一個新的 local repository:
說明: 1. 之後的 projects 也會建在此目錄下.
2. 可將產品名稱當成 repository 的目錄名稱;
此目錄下再建立多個與該產品相關的專案.
$ mkdir /Lanli/RD/git_repository
$ cd /Lanli/RD/git_repository
$ git init
// msg: Initialized empty Git repository in /Lanli/RD/git_repository/.git/
$ touch README
$ git add README
$ git commit -m 'first commit'
[master (root-commit) 3dbca1d] first commit
0 files changed, 0 insertions(+), 0 deletions(-)
create mode 100644 README
說明: 1. 查看 git 的用法 -> git --help
2. git 的 online manual: Git User's Manual
五. git 環境設定:
(僅供參考, Xcode 4 的環境已不太相同, 並且個別專案目錄下也要設定)
A. .gitignore 檔設定(僅供參考, Xcode 4 的環境已不太相同, 並且個別專案目錄下也要設定)
$ cd /Lanli/RD/git_repository
$ touch .gitignore
$ vi .gitignore
加入以下的內容:
# Mac OS X Finder and whatnot
.DS_Store
# Sparkle distribution Private Key (Don't check me in!)
dsa_priv.pem
# XCode (and ancestors) per-user config (very noisy, and not relevant)
*.mode1
*.mode1v3
*.mode2v3
*.perspective
*.perspectivev3
*.pbxuser
# Generated files
VersionX-revision.h
# build products
build/
*.[oa]
# Other source repository archive directories (protects when importing)
.hg
.svn
CVS
# automatic backup files
*~.nib
*.swp
*~
*(Autosaved).rtfd/
Backup[ ]of[ ]*.pages/
Backup[ ]of[ ]*.key/
Backup[ ]of[ ]*.numbers/
存檔並退出.
B. .gitattributes 檔設定
$ cd /Lanli/RD/git_repository
$ touch .gitattributes
$ vi .gitattributes
加入以下的內容:
*.pbxproj -crlf -diff -merge
存檔並退出.
說明: The line in .gitattributes treats your Xcode project file as a binary. This prevents Git from trying to fix newlines, show it in diffs, and excludes it from merges.Note that you will still see it shown as a conflict in merges, although the file won't have changed. Simply commit it and things should be good.
六. 加入 Projects:
A. 用 Xcode 新增一個(或多個) projects 放在 C. 建立的 local repository 下:Xcode 4 > File > New > New Project
瀏覽要存放的位置後, 然後給個名稱.
(在此: 路徑為 /Lanli/RD/git_repository ; 名稱為: helloGit )
B. 將此專案加入 repository:
$ cd /Lanli/RD/git_repository
$ git add helloGit
$ git commit -m 'helloGit project added'
[master 0459168] helloGit project added
18 files changed, 1484 insertions(+), 0 deletions(-)
create mode 100644 helloGit/helloGit.xcodeproj/project.pbxproj
create mode 100644 helloGit/helloGit.xcodeproj/xcuserdata/lanli.xcuserdatad/xcschemes/helloGit.xcscheme
......
七. 將 project 的 changes push 到 remote Repository:
A. 語法: git remote add origin git@github.com:username/ProjectName$ cd /Lanli/RD/git_repository
$ git remote add origin git@github.com:lanli/git_repository.git
// 如果出現訊息: fatal: remote origin already exists.
// 先執行: git remote rm origin ; 然後再重新 add 一次此步驟.
$ git push origin master
Counting objects: 31, done.
Delta compression using up to 2 threads.
Compressing objects: 100% (25/25), done.
Writing objects: 100% (31/31), 11.42 KiB, done.
Total 31 (delta 3), reused 0 (delta 0)
To git@github.com:lanli/git_repository.git
* [new branch] master -> master
B. 接著便可以 refresh account page, 並進入 Public Repositories 內的專案.
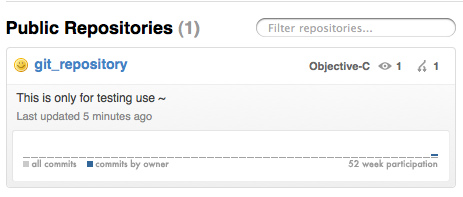
C. 點進 git_repository 裡看看:
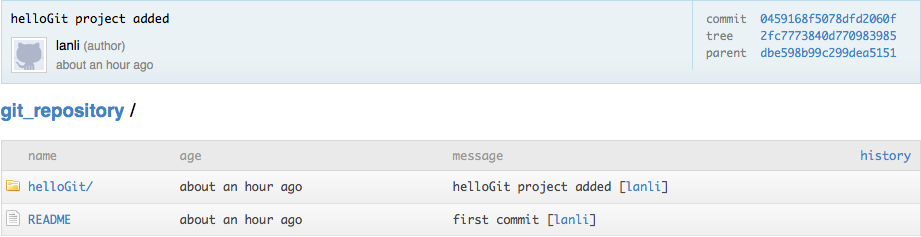
可看到所有從 local repository 所 commits 進來的檔案.
八. Xcode 4 的 Remote Repository:
A. 到 Xcode 4 的 Repositories 設定頁籤:Xcode 4 > 右上方 Organizer > 切到 Repositories tab , 會看到 local repository,
圖中有顯示:
Location /Lanli/RD/git_repository
Type Git
select modified file (檔名右方會有一個 M 符號 ) > 右鍵 >
Source Control > Commit Select Files.
$ cd /Lanli/RD/git_repository
$ git push origin master
說明: 更新 remote Repository 的專案後可看到:
name age message
helloGitViewController.h 5 minutes ago add comment test
$ cd /Lanli/RD/git_repository
$ git pull origin master
Mac OS X: SmartGit - Git分散式版本控制系統(DVCS)的GUI客戶端。
A. 先安裝 git:
1. 下載 git-osx-installer: http://code.google.com/p/git-osx-installer/
===> 使用版本: Git Installer 1.7.2 - OS X - Leopard - Intel
2. Step 1 - Install Package:
===> This installs git to /usr/local/git. Root access is required.
3. Step 2 - Run shell script: (optional)
===> Non-terminal programs don't inherit the system wide PATH and MANPATH variables that your terminal does. If you'd like them to be able to see Git, for whatever reason, you can run this script. It will add the PATH and MANPATH to your ~/.MacOSX/environment.plist file. You'll need to log out of your user account for that to take effect.
(i.e. 在終端機下執行 "setup git PATH for non-terminal programs.sh" 檔案)
B. 安裝 SmartGit:(正式版須付費)
1. 官網: http://www.syntevo.com/
===> 使用版本: Version 1.5.5
2. 安裝過程選擇 git 執行檔的位置: /usr/local/git/bin/git. (無法瀏覽到的話, 就自己 key in)
C. 使用 SmartGit:
1. Create a new local Git working tree:
===> /Volumes/Snow Leopard/Lanli/RD/iPhone_Projects/iPodTouch/CheckNetSample
> Continue > Initialize > Project Name: CheckNetSample > Finish
2. 將以下的檔案:
.DS_Store
*.swp
build/
*.pbxuser
*.perspective
*.perspectivev3
*.mode1v3
*.mode2v3
===> 右鍵 > Ignore => 便會自動產生 .gitignore 檔案.
3. 接著, 便可以 commit 了.
全站熱搜

 留言列表
留言列表

