實作 TableView Section 展開/收合
 from http://blog.yslin.tw/2011/09/tableview-section.html
iPhone中的UITableViewController變化真的很多!
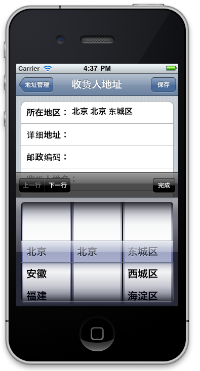
最近剛好需要實作展開/收合的功能,效果如圖所示:


我是參考Expanding/Collapsing TableView Sections的實作,然後在自己簡化。
一個展開/收合的單位為一個Section,Row0表示Parent,Row1~N表示Child,程式碼中都有註解。


  • testTableViewController.h


  • 1

    2

    3

    4

    5

    6

    7

    8


    #import <uikit uikit.h="">


    @interface MoodDiaryViewController : UITableViewController {

     /* Store the indexpath which already expanded */

     NSMutableIndexSet *expandedSections;

    }

    @end

    </uikit>


  • testTableViewController.h


  • 1

    2

    3

    4

    5

    6

    7

    8

    9

    10

    11

    12

    13

    14

    15

    16

    17

    18

    19

    20

    21

    22

    23

    24

    25

    26

    27

    28

    29

    30

    31

    32

    33

    34

    35

    36

    37

    38

    39

    40

    41

    42

    43

    44

    45

    46

    47

    48

    49

    50

    51

    52

    53

    54

    55

    56

    57

    58

    59

    60

    61

    62

    63

    64

    65

    66

    67

    68

    69

    70

    71

    72

    73

    74

    75

    76

    77

    78

    79

    80

    81

    82

    83

    84

    85

    86

    87

    88

    89

    90

    91

    92

    93

    94

    95

    96

    97

    98

    99

    100

    101

    102

    103

    104

    105

    106

    107

    108

    109

    110

    111

    112

    113

    114

    115

    116

    117

    118

    119

    120

    121

    122

    123

    124

    125

    126

    127

    128


    #import "testTableViewController.h"


    @implementation MoodDiaryViewController


    #pragma mark -

    #pragma mark View lifecycle


    - (void)viewDidLoad {

        [super viewDidLoad];


     if (!expandedSections)

        {

            expandedSections = [[NSMutableIndexSet alloc] init];

        }

    }


    #pragma mark -

    #pragma mark Table view data source


    - (NSInteger)numberOfSectionsInTableView:(UITableView *)tableView {

        // Return the number of sections.

        return 3;

    }


    - (NSInteger)tableView:(UITableView *)tableView numberOfRowsInSection:(NSInteger)section {

        /* Return the number of rows in the section. */

     if ([expandedSections containsIndex:section]) {

      /* Return all rows when expanded */

      return 5;

     } else {

      /* Only top row showing */

      return 1;

     }

    }


    // Customize the appearance of table view cells.

    - (UITableViewCell *)tableView:(UITableView *)tableView cellForRowAtIndexPath:(NSIndexPath *)indexPath {

        NSString *CellIdentifier = [NSString stringWithFormat:@"Cell%d_%d", indexPath.section, indexPath.row];

     UITableViewCell *cell = [tableView dequeueReusableCellWithIdentifier:CellIdentifier];


     if (indexPath.row == 0) {

      /* Parent cell */

      if (cell == nil)

       cell = [[[UITableViewCell alloc] initWithStyle:UITableViewCellStyleDefault reuseIdentifier:CellIdentifier] autorelease];


      /* Change UI status */

      if ([expandedSections containsIndex:indexPath.section]) {

       cell.textLabel.text = [NSString stringWithFormat:@"- Section=%d Row=%d", indexPath.section, indexPath.row];

      } else {

       cell.textLabel.text = [NSString stringWithFormat:@"+ Section=%d Row=%d", indexPath.section, indexPath.row];

      }


     } else {

      /* Child cell */

      if (cell == nil)

       cell = [[[UITableViewCell alloc] initWithStyle:UITableViewCellStyleSubtitle reuseIdentifier:CellIdentifier] autorelease];


      cell.textLabel.text = [NSString stringWithFormat:@"Section=%d Row=%d", indexPath.section, indexPath.row];

     }


        return cell;

    }


    #pragma mark -

    #pragma mark Table view delegate


    - (void)tableView:(UITableView *)tableView didSelectRowAtIndexPath:(NSIndexPath *)indexPath {

     /* If user choose the parent row */

     if (indexPath.row == 0) {

      NSInteger section = indexPath.section;

      BOOL currentlyExpanded = [expandedSections containsIndex:section];

      NSInteger rows;

      NSMutableArray *arrRows = [NSMutableArray array];


      if (currentlyExpanded) {

       /* Child cell for this parent */

       rows = [self tableView:tableView numberOfRowsInSection:section];

       [expandedSections removeIndex:section];

      } else {

       [expandedSections addIndex:section];

       rows = [self tableView:tableView numberOfRowsInSection:section];

      }


      /* Create child index path. Child path start frow index one */

      for (int i = 1; i < rows; i++) {

       NSIndexPath *tmpIndexPath = [NSIndexPath indexPathForRow:i inSection:section];

       [arrRows addObject:tmpIndexPath];

      }


      UITableViewCell *cell = [tableView cellForRowAtIndexPath:indexPath];


      /* Remove of insert above index path into tableview */

      if (currentlyExpanded) {

       [tableView deleteRowsAtIndexPaths:arrRows withRowAnimation:UITableViewRowAnimationTop];

       cell.textLabel.text = [NSString stringWithFormat:@"+ Section=%d Row=%d", indexPath.section, indexPath.row];

      } else {

       [tableView insertRowsAtIndexPaths:arrRows withRowAnimation:UITableViewRowAnimationTop];

       cell.textLabel.text = [NSString stringWithFormat:@"- Section=%d Row=%d", indexPath.section, indexPath.row];

      }


     } else { // For choosing child row

      ;

     }

    }


    #pragma mark -

    #pragma mark Memory management


    - (void)didReceiveMemoryWarning {

        // Releases the view if it doesn't have a superview.

        [super didReceiveMemoryWarning];


        // Relinquish ownership any cached data, images, etc. that aren't in use.

    }


    - (void)viewDidUnload {

        // Relinquish ownership of anything that can be recreated in viewDidLoad or on demand.

        // For example: self.myOutlet = nil;

    }


    - (void)dealloc {

        [super dealloc];

    }

    @end


    zer931 發表在 痞客邦 留言(0) 人氣()

    lunar-2013-06
    本文引用自changyy - iOS 開發筆記 - 國曆轉農曆計算 (Chinese Lunar Calendar)


    iOS 開發筆記 - 國曆轉農曆計算 (Chinese Lunar Calendar)


    zer931 發表在 痞客邦 留言(0) 人氣()


    UIView 同時移動、旋轉、放大的作法
    from http://servinggear.blogspot.tw/2012/02/uiview.html
     

    zer931 發表在 痞客邦 留言(0) 人氣()


    GCD介绍(一): 基本概念和Dispatch Queue


    from http://www.dreamingwish.com/dream-2012/of-of-of-of-gcd-introduced-1-basic-concepts-in-and-the-dispatch-queue.html
    发布者: Seven's - 2012/02/28 - 分类:GCD教程

    zer931 發表在 痞客邦 留言(0) 人氣()


    iOS 基于键盘的编程所需技巧
    from http://blog.csdn.net/zhangao0086/article/details/7063733
    IOS官方文件 可搜尋範例 KeyboardAccessory

    zer931 發表在 痞客邦 留言(0) 人氣()

    - (CGPoint)convertPoint:(CGPoint)point toView:(UIView *)view;
    根据指定view参照物,转换点的坐标
    比如在一个View上一个Button,在button上有个点,相对button的坐标知道了,想知道这个点在这个View上的坐标,就可以用这个API去转换

    zer931 發表在 痞客邦 留言(0) 人氣()

    如果要在其他class存取 XXXAppDelegate內的變數有兩種做法
     
    一.
    1在XXXAppDelegate的變數設定@property

    zer931 發表在 痞客邦 留言(0) 人氣()


    饼状图的绘制
    from http://www.winddisk.com/2012/06/17/piechart/
    Posted on by xuguoxing

    zer931 發表在 痞客邦 留言(0) 人氣()

    螢幕快照 2012-11-05 下午12.16.37
    TableView Cell 使用方法dequeueReusableCellWithIdentifier
    從xib或storyboard 使用自定cell
     
    - (UITableViewCell *)tableView:(UITableView *)tableView  cellForRowAtIndexPath:(NSIndexPath *)indexPath

    zer931 發表在 痞客邦 留言(0) 人氣()

    image_thumb8.png
    UITableView cell自訂視圖中插入Table實現複雜介面
    from http://fecbob.pixnet.net/blog/post/35423964
    最近專案中需要實現如下圖所示的效果:
      

    zer931 發表在 痞客邦 留言(0) 人氣()

    Iphone在table cell中添加自訂佈局view
    from http://fecbob.pixnet.net/blog/post/35424051


    在android開發listView中,每一行的清單可以通過相應的xml定義視圖。在iphone開發中,tableView也提供了通過nib自訂視圖的解決方案。這就使開發者能夠完成相當複雜的介面佈局。


    下麵介紹table中添加自訂的table cell。實現的效果如下:


    image_thumb6.png  


    實現過程很簡單,首先創建一個table視圖,添加table相應的協定。這一步很簡單,在這裡就不寫如何實現的了。不懂的可以看我以前的博客,或者看原始程式碼。


    接下來,新建檔 並在 subclass 裡 選擇 UITableViewCell 這裡我命名為 “MyCell”


    然後在利用IB創建一個名為mycell的nib,在裡面拖入一個UITableViewCell並將其類名改為MyCell。

    image_thumb7.png  


    -(NSInteger) tableView:(UITableView *)tableView


    numberOfRowsInSection:(NSInteger)section


        return 1; 
    }


    - (UITableViewCell *)tableView:(UITableView *)tableView cellForRowAtIndexPath:(NSIndexPath *)indexPath 

        static NSString *CellIdentifier = @"CustomCellIdentifier"; 
        MyCell *cell = (MyCell *)[tableView dequeueReusableCellWithIdentifier:CellIdentifier]; 
        if (cell == nil) { 
            NSArray *array = [[NSBundle mainBundle] loadNibNamed:@"mycell" owner:self options:nil]; 
            cell = [array objectAtIndex:0]; 
            [cell setSelectionStyle:UITableViewCellSelectionStyleGray]; 
        } 
        [[cell lable] setText:@"你好"]; 
        //[[cell imageView] setImage:[UIImage imageNamed:[imageNameArray objectAtIndex:indexPath.row]]]; 
        //[[cell nameLabel] setText:[nameArray objectAtIndex:indexPath.row]]; 
        return cell; 

    - (CGFloat)tableView:(UITableView *)atableView heightForRowAtIndexPath:(NSIndexPath *)indexPath  


    {       
        return 90; 
    }


    zer931 發表在 痞客邦 留言(0) 人氣()

    NSMutableArray Sort
     from http://sorrowslee.blogspot.tw/2012/07/nsmutablearray-nsstring-sortorder-array.html

    今天來分享一下NSMutableArray的排序方式
    NSString *sortOrder = @"AaBbCcDdEeFfGgHhIiJjKkLlMmNnOoPpQqRrSsTtUuVvWwXxYyZz_0123456789";

    [array sortUsingComparator:^NSComparisonResult(id obj1, id obj2)
    {
    char char1 = [(NSString *)obj1 characterAtIndex: 0];
    char char2 = [(NSString *)obj2 characterAtIndex: 0];

    int index1;
    for (index1 = 0; index1 < sortOrder.length; index1++)
    if ([sortOrder characterAtIndex: index1] == char1)
    break;

    int index2;
    for (index2 = 0; index2 < sortOrder.length; index2++)
    if ([sortOrder characterAtIndex: index2] == char2)
    break;

    if (index1 < index2)
    return NSOrderedAscending;
    else if (index1 > index2)
    return NSOrderedDescending;
    else
    return [(NSString *)obj1 compare: obj2 options: NSCaseInsensitiveSearch];
    }];


    這樣Array就會照英文跟數字的方式來排序了

    zer931 發表在 痞客邦 留言(0) 人氣()

    1 2
    Blog Stats
    ⚠️

    成人內容提醒

    本部落格內容僅限年滿十八歲者瀏覽。
    若您未滿十八歲,請立即離開。

    已滿十八歲者,亦請勿將內容提供給未成年人士。